Complete Guide to Installing Parch
Before you begin the installation, be sure to read the Choose the right version page. There you will learn about the differences between the various Parch editions and can pick the one that suits you.
Installation video tutorial
If you prefer to watch the installation process visually, a complete video of how to install Parch was recorded by the kind Amirhossein Panahifar, and you can watch it. The video shows every step of the installation.
Preparing for installation
After downloading the ISO file of the edition you want from the official Parch website, it is time to prepare the removable drive. To do this, you need to write the ISO file to the removable drive (USB stick). You can do this with various tools. If you use Windows, tools such as rufus or ventoy are good choices. Linux users can use the dd tool.
After preparing the removable drive, shut down your computer and turn it on again. While it starts up, press the key that opens the boot menu. Depending on your motherboard manufacturer, this key can be F12, F2, F9, F10 or even Delete. Usually, while the computer is starting up, the bottom of the screen shows which key you should press to enter the boot menu.
In the boot menu, select your removable drive and press Enter. If you cannot see the removable drive, you may need to check your BIOS or UEFI settings and enable booting from the removable drive.
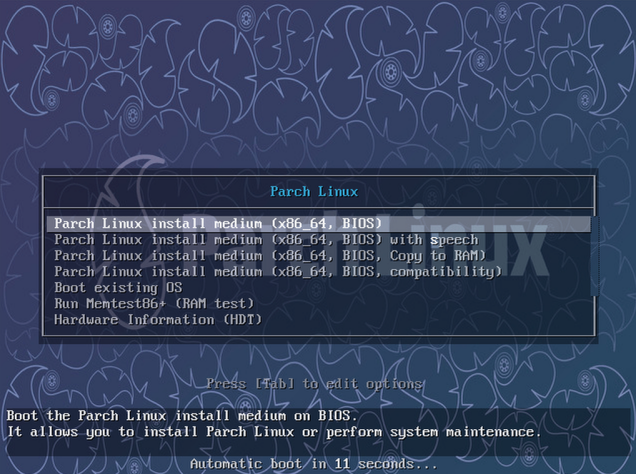
Choosing the right boot option
After booting from the removable drive, you are greeted by a screen with several options. Each of these options is designed for a particular situation. Below you will get to know each one:
First option, normal Parch installation: This option is suitable for most users. If your computer has ordinary specifications and you have no particular problem with the hardware, choose this option. In this case, all of Parch's features are loaded normally and you can start the installation process.
Second option, installation with a screen reader: This option is designed for visually impaired and blind users. By choosing it, a spoken screen reader is activated that reads the contents of the screen to you. This feature helps people with visual difficulties install Parch easily.
Third option, installation with a copy in RAM: If your computer has more than four gigabytes of RAM, choose this option. In this case, all the files needed for the installation are first copied to RAM. The advantage of this method is that if the removable drive is detached from the computer for any reason during the installation, the process will not fail and you can continue. This option is especially useful for those who worry about the removable drive moving or being unplugged by accident.
Fourth option, installation in compatibility mode: If choosing the previous three options makes your screen go black or Parch does not load properly, try this option. In this case, Parch starts without loading advanced drivers such as graphics card drivers. This mode is very useful for computers that work with older or non-standard hardware.
The Parch live environment
After you choose one of the options above and Parch loads, you are greeted by the Parch desktop environment. This stage is called the "live session". In this state, Parch runs from the removable drive and makes no change to your computer's hard disk or main memory.
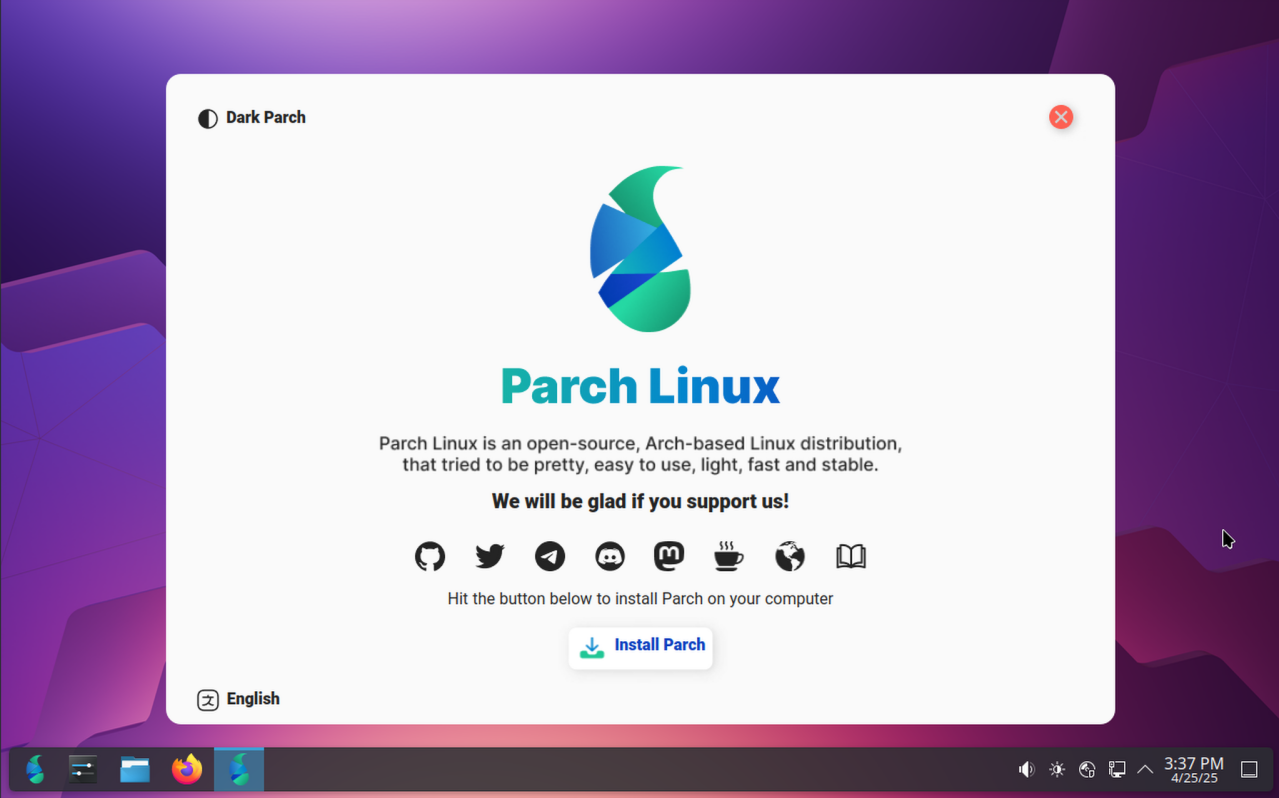
In the live session, you can try Parch and see whether all your hardware works properly. You can go online, try the programs and explore the desktop environment. This is a great opportunity to get to know Parch before the actual installation.
By default, in the live session, the amount of memory Parch can use is one gigabyte. If you need to change this amount, you can read the guide on changing this memory in the Parch wiki tips section.
When you are ready to install Parch, click the "Install Parch" button shown on the desktop. You can also run the "Install Parch Linux" option from the applications menu.
Starting the installation process
After clicking the install button, the Parch installer, which is called Calamares, runs. This program guides you through the installation process step by step.
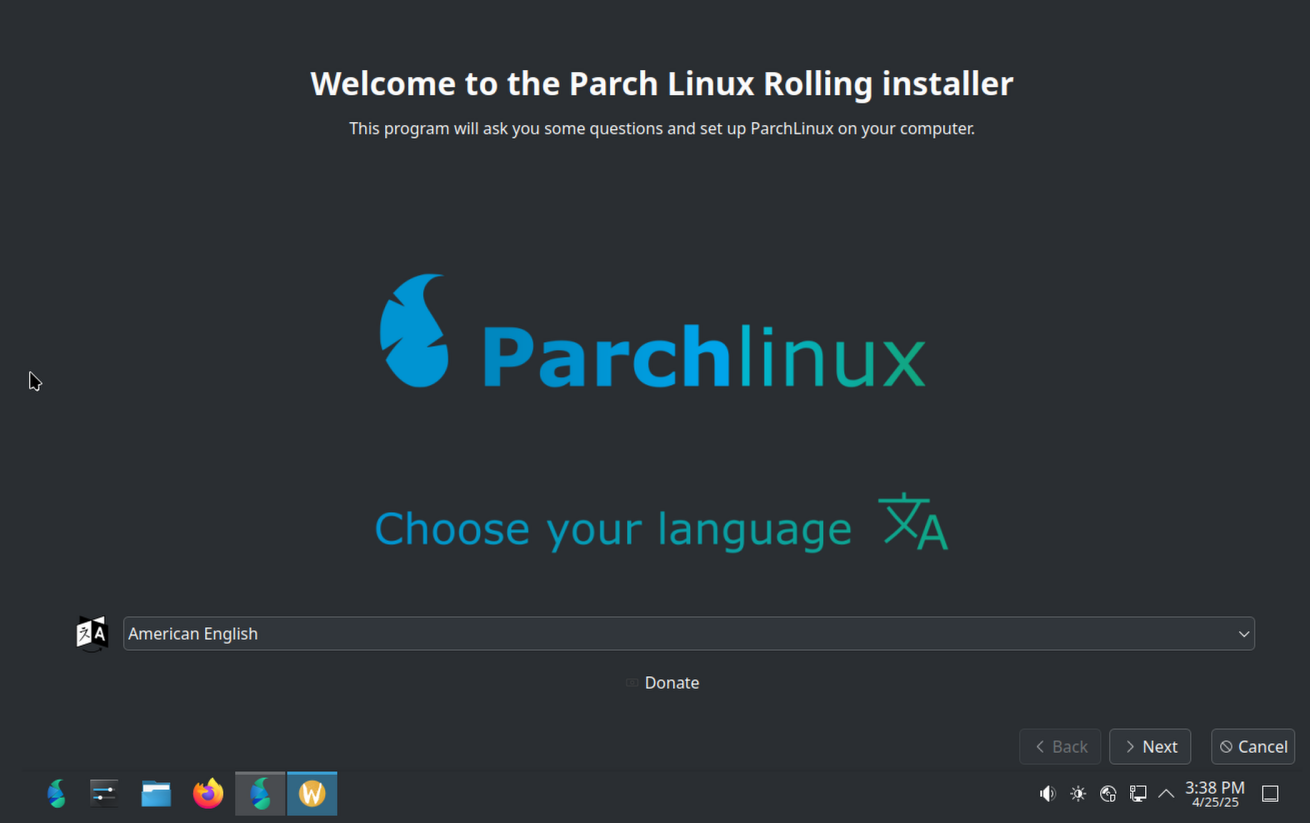
Choosing the installation language
The first screen you see is the language selection screen. Here you can choose the language you want to be used during the installation process. If you choose Persian, all the installer texts are shown in Persian.
If you intend to install the Plasma edition of Parch, it is recommended to leave the installation language on English. The reason is that some parts of the Plasma desktop have not yet been fully translated into Persian and you may run into problems.
After choosing the language you want, click the next button to go to the next step.
Setting the keyboard
In the next step, the keyboard settings screen opens. The keyboard plays an important role in how comfortable your work is. By default, the English keyboard is active. If you want to use a Persian keyboard or that of another language, you can add it to the list.
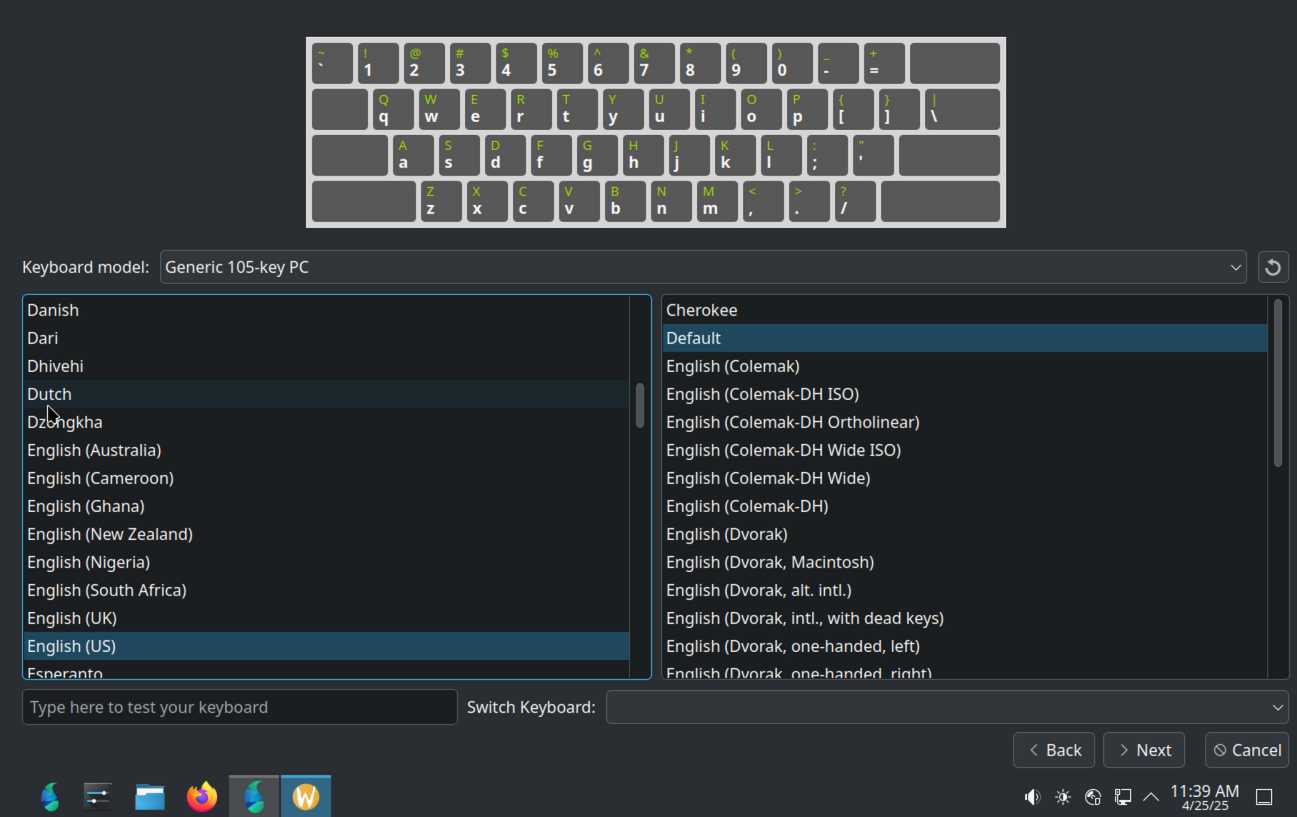
On this screen there is a section for testing the keyboard. You can type in this box and see whether the keys work correctly. This feature helps you make sure your keyboard settings are correct.
For example, if you want to have both a Persian and an English keyboard, first find the Persian keyboard in the list and add it. Then, using the key combinations that are shown, you can switch between the two keyboards.
After setting the keyboard, click the next button.
Setting the time zone
In this step, you must choose your time zone. The time zone determines which geographic region your system clock is set to.
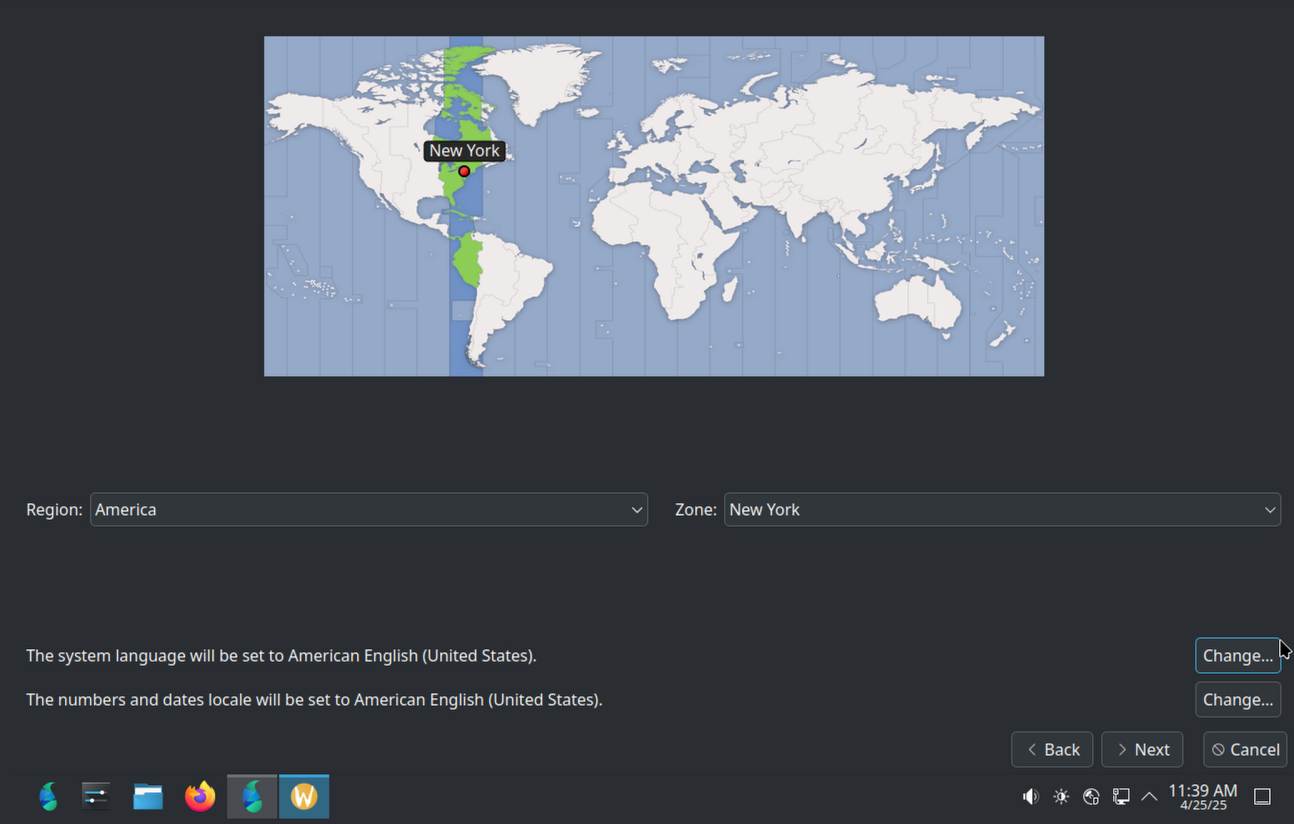
On the map you can click on your country or city. For example, if you live in Tehran, click on Tehran. The program detects the appropriate time zone automatically.
If you cannot find your city on the map, you can choose it from the country list shown at the bottom. After choosing the time zone, click the next button.
The sensitive step: partitioning the hard disk
This step is one of the most important and most sensitive parts of the installation. Here you decide on which hard disk Parch will be installed and with what layout. If a mistake happens at this step, your important data may be erased. So continue with care.
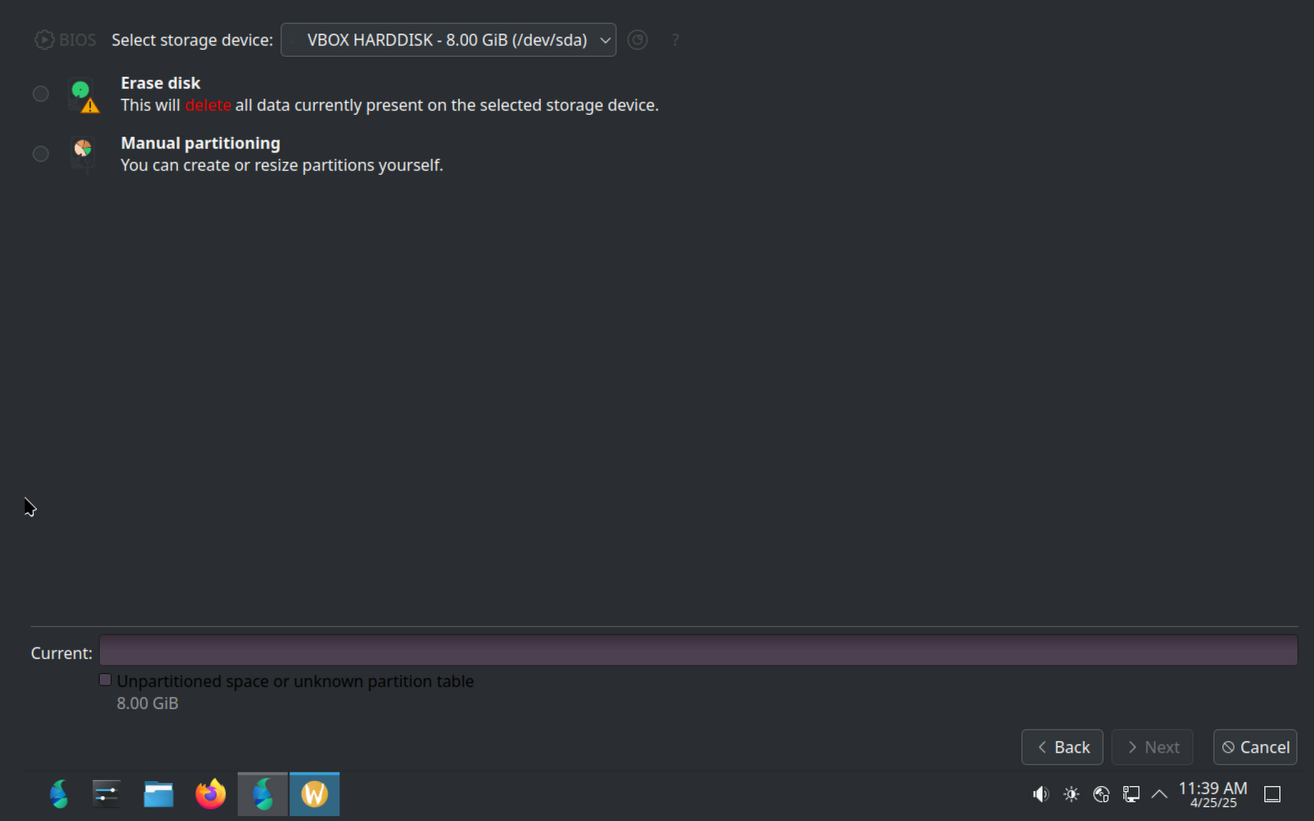
Important warning: be very careful at this step. A wrong choice can lead to the loss of your data. If you are not sure, it is better to get help from someone experienced or to ask on the Parch forum.
Depending on your type of system, several different options are shown. Below you will get to know each of these options in detail.
Full disk erase mode
This method is the simplest way to install Parch. If your hard disk is empty or its contents do not matter to you, choose this option. By choosing it, all data and existing partitions on the selected hard disk are erased and Parch is installed from scratch.
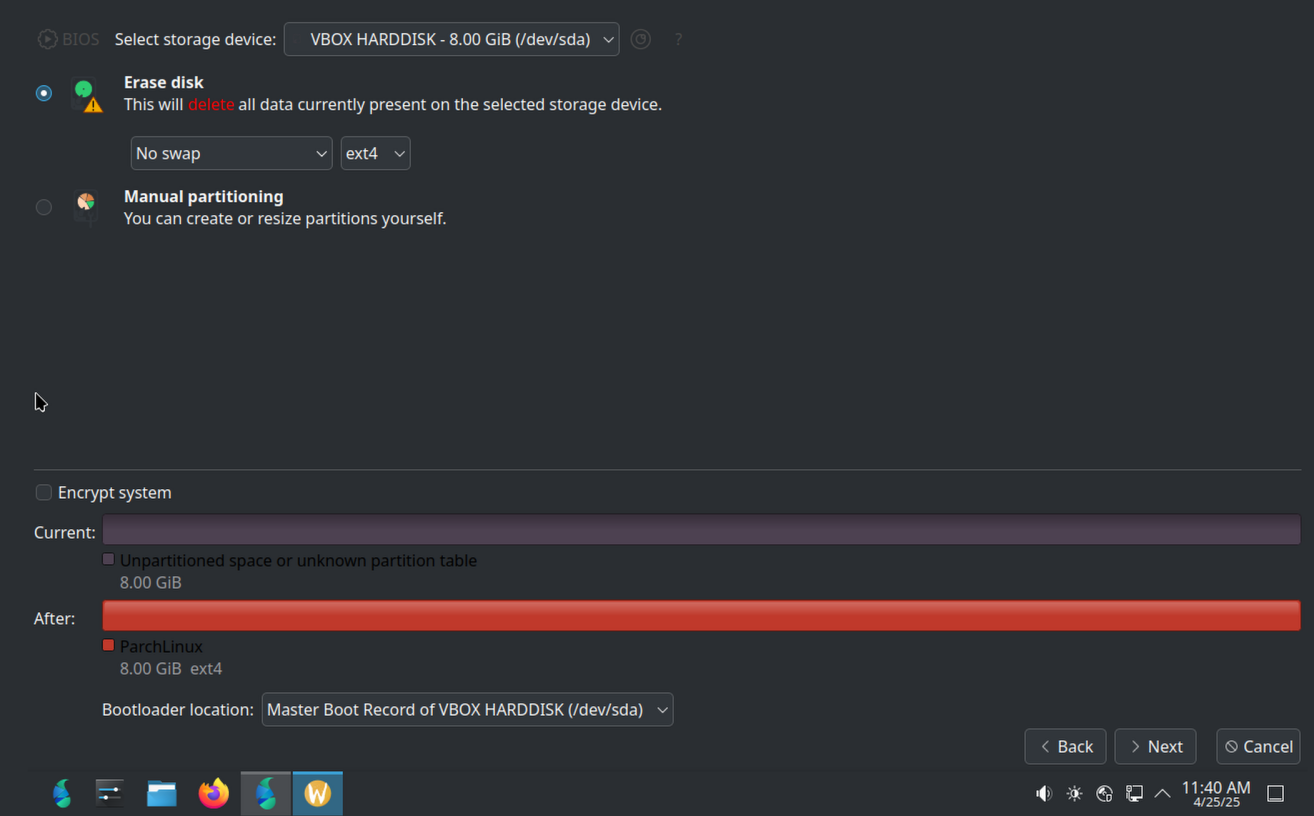
In this case, there are several important settings you should make:
Setting the swap space: The swap space acts like an auxiliary memory. When your RAM fills up, the system can move part of the data to the swap space. There are four modes for setting swap:
The first mode, no swap, creates no swap space at all. This mode is suitable for computers that have a lot of RAM. If your computer has eight gigabytes of RAM or more and you do not intend to use hibernate, you can choose this option.
The second mode, swap without hibernate, creates a swap partition but does not support hibernate. Hibernate is a feature that lets you shut down the computer and have all your open programs and windows come back exactly as they were. If you do not need this feature, this option is suitable.
The third mode, swap with hibernate, creates a swap partition that supports hibernate. If you want to be able to shut down the computer and then continue exactly from where you were, choose this option.
The fourth mode, swap as a file, creates a file for swap instead of a separate partition. This method is more flexible because you can change the size of the swap file later.
Choosing the file system: The file system determines how data is stored on the hard disk. There are three main options:
The ext4 file system is the oldest and most stable option. If you do not know which to choose, choose this option. This file system is trusted and is suitable for most users.
The xfs file system is optimized for working with large files. If you intend to work with video files or large databases, this option is more suitable.
The btrfs file system is the newest option and has advanced features such as system snapshots. This feature lets you take a snapshot of the current state of the system and, if a problem arises, return to that state. It is recommended for advanced users.
Manual partitioning mode
If you want to install Parch alongside another operating system (for example, Windows) or you want full control over how the hard disk is divided, choose this option. This method is the best choice for dual booting.
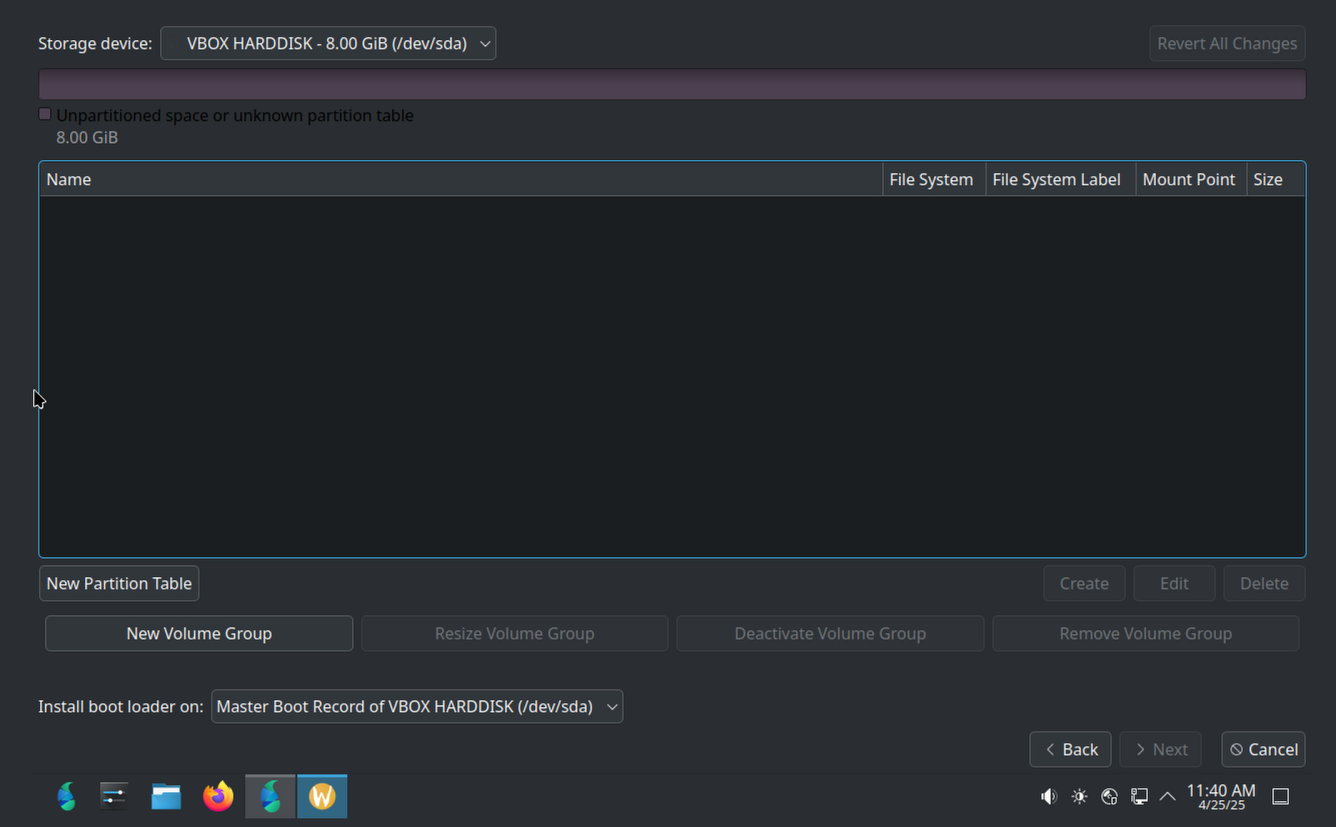
In this case, you must create and set up the partitions yourself. There are various tools on this screen, which you will get to know below.
The "New Partition Table" button erases all existing partitions and creates an empty partition table. Press this button only when you are sure you want to erase everything.
The "Create" button lets you create a new partition. When you press it, a window opens in which you must enter the partition information:
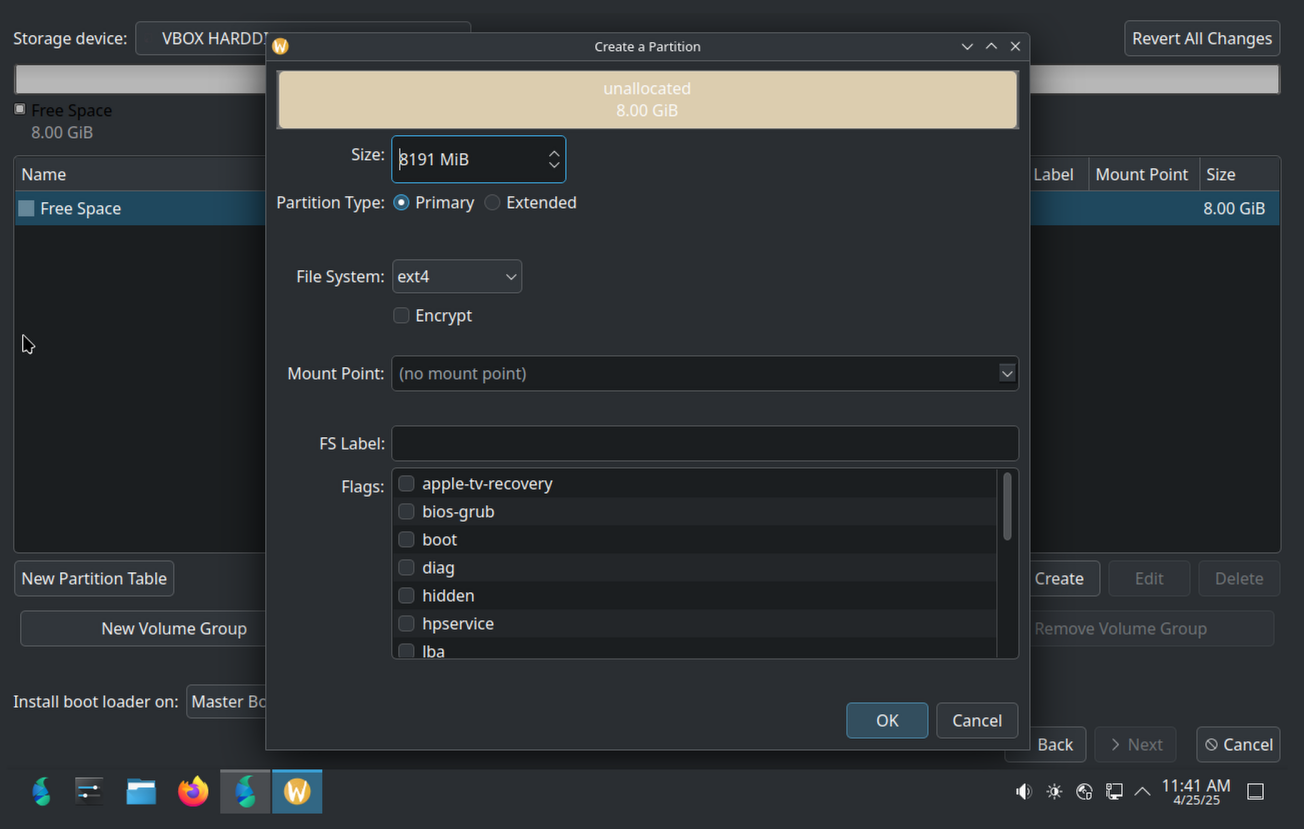
In this window, you must specify three important things: the size of the partition, its type and its file system. Below you will get to know each of the partitions you need:
Root partition: This partition is the most important part of the installation. All the operating system files of Parch are placed in this partition. The minimum space needed for this partition is twenty gigabytes, but it is recommended to allocate at least forty gigabytes so that you have enough space to install programs and store data.
For this partition's file system, you can choose between ext4 and btrfs. If you do not know which to choose, choose ext4.
A very important point: you must set this partition's mount point to the slash sign (/). This sign indicates that this partition is the root of the system.
EFI partition (only for UEFI systems): If your computer boots with the UEFI system (most new computers are UEFI), you must have an EFI partition. This partition contains the system's boot files.
The minimum space needed for this partition is one gigabyte. Some computers may need more space, so it is better to keep to this amount.
This partition's file system must be fat32. This is the only file system that UEFI systems can read.
You must set this partition's mount point to /efi.
If you are installing Parch alongside Windows, there is probably an EFI partition already. In that case, you should not create a new partition. Just select the existing partition and set its mount point to /efi.
Swap partition: This partition is optional, but it is recommended that you create it. The size of this partition depends on the amount of your RAM:
If your computer has less than four gigabytes of RAM, make the swap partition twice the amount of RAM. For example, if you have two gigabytes of RAM, make the swap partition four gigabytes.
If your computer has more than four gigabytes of RAM, four gigabytes is enough for the swap partition.
If you intend to use hibernate, the swap partition must be at least as large as your RAM. For example, if you have eight gigabytes of RAM, the swap partition must be at least eight gigabytes.
If you do not need hibernate and your computer has enough RAM, you can skip creating a swap partition and use zram instead. zram compresses part of the RAM and uses it as swap.
Important points about partitioning:
To install Parch on older systems that use BIOS, you only need a root partition. The swap partition is optional.
To install Parch on newer systems that use UEFI, you need two partitions: a root partition (mandatory), an EFI partition (mandatory) and a swap partition (optional).
If you are installing a dual boot, be sure that you have not touched the partitions of the other operating system. Only create new partitions for Parch.
After you have created and set up all the partitions you need, click the next button.
Creating a user account
In this step, you must enter your user account information. This user account will be your main account on the system.
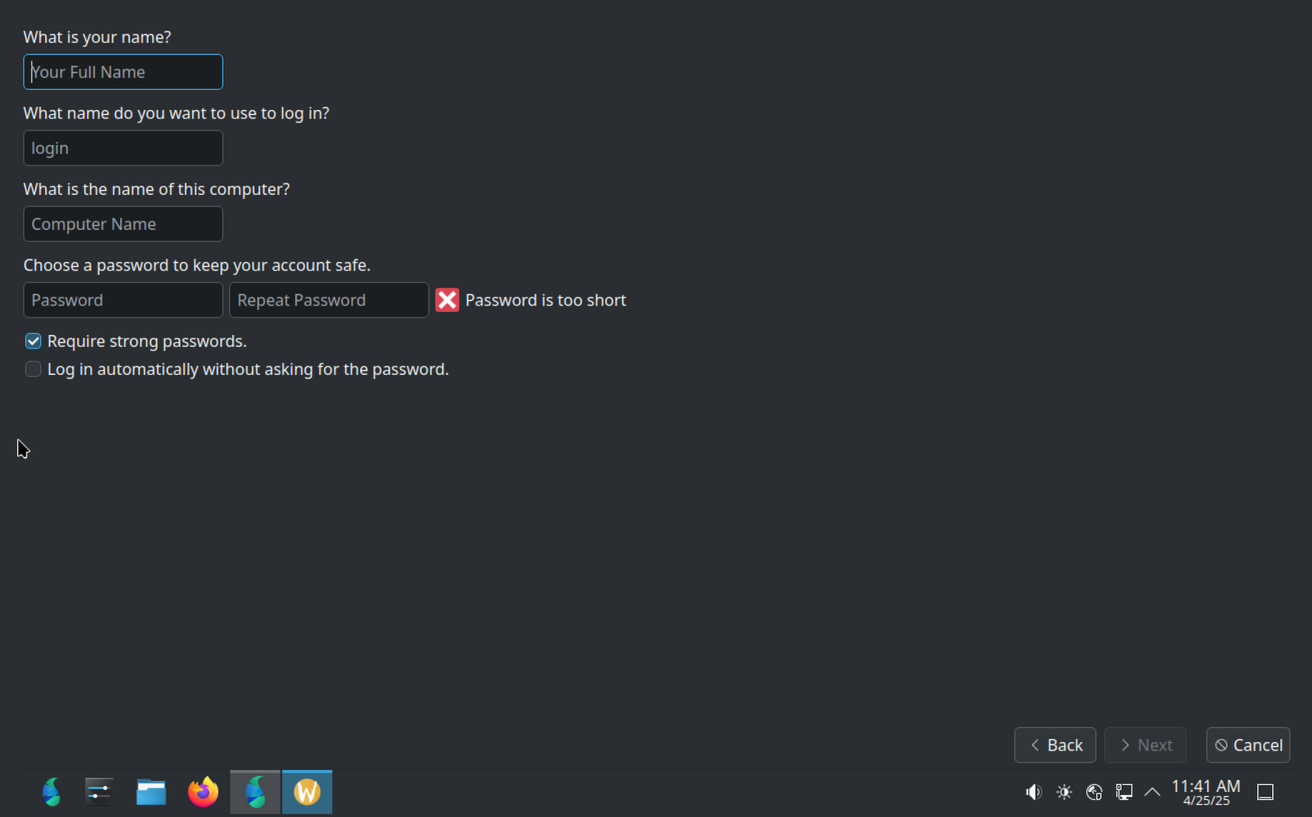
The first box is for your real name. This name is only used for display and can contain spaces and Persian letters. For example: "Ali Ahmadi".
The second box is for the username. This name is used to log in to the system and must contain only lowercase English letters and no spaces. For example: "ali" or "aliahmadi".
The third and fourth boxes are for the password. You must choose a strong password that includes a mix of uppercase and lowercase letters, numbers and symbols. You must enter the password twice to make sure you have not made a typing mistake.
A password is required and you must choose one. Write your password down somewhere so you do not forget it. Use a secure password that is hard for others to guess.
If you want Parch to log in to your user account automatically when it starts, tick the "Automatic login" option. This option is suitable for personal computers that only you use.
After entering your user account information, click the next button.
The installation summary screen
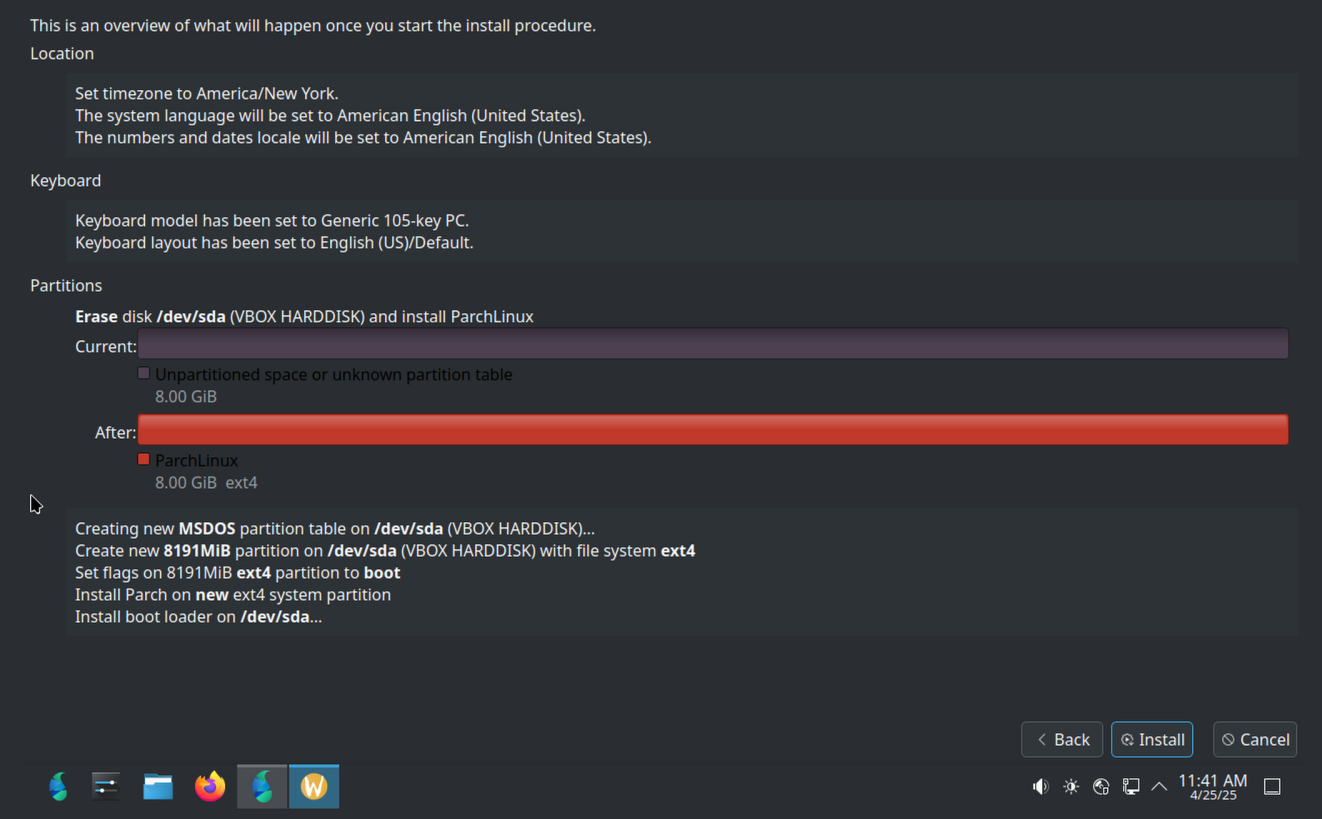
After entering the user account information, this screen is shown to you. On this screen, a summary of all the settings you made is shown. This is your last chance to review and change them.
On this screen you can see:
-
What language you have chosen. If you chose the wrong language, you can go back to the first screen with the back button and change it.
-
What keyboard you have set up. If you need to add another keyboard, you can go back and add it.
-
Which city or country your time zone is. If the time zone is wrong, you can correct it.
-
How the partitioning you did looks. This part is very important. Carefully check whether the correct partitions have been chosen. If you notice a mistake, be sure to go back and correct it.
-
What your user account information is. Check the username and display name you have chosen.
If everything is correct and you are sure you want to start the installation, click the "Install" button. After this step, the installation process begins and the changes are applied to your hard disk.
The installation process
After clicking the install button, the installation process starts. At this stage, the installer performs the following steps:
First it formats the partitions you chose. This may take a few minutes depending on the size of the partitions.
Then it copies the Parch operating system files to the root partition. This part is usually the longest part of the installation and may take between ten and twenty minutes.
After the files are copied, the system settings such as language, keyboard, time zone and user account are applied.
Finally, the system bootloader is installed so that you can boot Parch.
During this process, a progress bar is shown that tells you how far the installation has progressed. Messages are also shown at the bottom of the screen explaining what operation is currently being performed.
Please be patient at this stage and do not turn off the computer or detach the removable drive. Interrupting the installation process can lead to a broken system.
When the installation is complete, a message is shown telling you that the installation was successful. At this stage you can restart the computer.
After installation
After the installation is complete and you have restarted the computer, detach the removable drive from the computer so that the system boots from the hard disk and not from the removable drive.
When Parch starts for the first time, it may take a little longer because the system is doing its initial setup. Do not worry, this is normal.
After you log in, the first thing you should do is update the system. Updating helps you get the latest versions of programs and security patches.
To update the system, you must first connect to the internet. If you use a wired connection, the connection is established automatically. If you use Wi-Fi, click the network icon and choose your network.
After connecting to the internet, open the terminal. You can find it by searching for the word "terminal" in the applications menu.
In the terminal, type the following command:
sudo pacman -Syu
After typing this command, press Enter. You are asked for a password. Type the password you entered during the installation. Note that while you type the password, nothing is shown on the screen. This is a security feature, so do not worry. Just type the password and press Enter.
After entering the password, the system begins to check for available updates. If there are updates, a list of the packages that are going to be updated is shown. By typing the letter Y and pressing Enter, the update process begins.
Depending on the number of updates and your internet speed, this process may take from a few minutes to a few tens of minutes. Be patient until all the updates are downloaded and installed.
After the update is finished, it is recommended to restart the computer once so that all the changes are applied correctly.
Next steps and getting to know Parch
Now that you have installed Parch successfully, it is time to get to know its features. In the Parch wiki, there is a lot of educational material that you can use.
If your computer has an NVIDIA graphics card, you should install its specific drivers for better performance. To do this, you can read the guide to installing NVIDIA drivers on Parch.
To learn how to install and remove programs on Parch, you can read the Package Management in Parch guide. It teaches you how to install the programs you need.
If you run into a problem while using Parch, or if you have a question, you can visit the Parch forum. On the forum, other users and the Parch developers are ready to help you. Before asking a question, try to search and see whether someone has already asked the same question. This helps you reach an answer faster.
When you ask a question on the forum, try to give complete details. Say exactly what you did, what error you received and what information you have about your system. This information helps others help you better.
The end and the start of a new journey
Congratulations! You have successfully installed Parch Linux on your computer. Now you are a member of the Parch user community. Parch is an Iranian distribution built with the great effort of Iranian developers.
By using Parch, you not only use a powerful and secure operating system, but you also help the development of free software in Iran. Every feedback, every bug report and every suggestion you give to the Parch team helps improve this distribution.
If you are happy with Parch, introduce it to your friends and acquaintances. The larger the Parch user community grows, the stronger and better this distribution will be.
Your journey with Linux and Parch has just begun. With curiosity, patience and practice, you will see how flexible and powerful this operating system is.
If you have a question, go to the Parch forum. We are ready to help you!